Posts tagged "tutorial"
← All tags
September 7, 2023
Citizens of some countries need a visa to enter Singapore. If you have friends or family that belong to those countries, you can do them a huge favor by applying as a local contact.
As long as you are a Singapore citizen or Singapore PR with SingPass, or director of a Singapore-registered business, you can help your friend get a visa. Please make sure that you actually know this person!
I only do this for people I know.
It can save them a lot of time and money. Most of the time, I do this for my friends from India. It's much faster and it also costs less than them going to a visa agent.
The following instructions are for Singapore citizens and PRs who have SingPass.
- Before you start, send this PDF form to the person you are applying for the visa for
- Ask them to write down the answers to all the questions in a document, and send it to you. Also ask them to attach a passport photo in the right format
- Visit this ICA page and click on "Apply for a an entry visa as a local contact (Individual Users)"
- Log in with SingPass
- Click on "Individual Visa Application" to apply for 1 person, or "Family Visa Application" to apply for more than 1 person (they must be married; children above the age of 21 must have their individual applications)
- Fill in the form according to the information your friend provided you. Be sure to get their birthday, passport issue date and passport number correct.
- Upload their passport photo
- Pay: you can pay with American Express Cards, PayNow, or eNets (internet banking).
Save the application as a PDF. It will take 3 working days to receive a response, but in my experience it has been usually faster than that (next day has been the norm).
You can look up the status of your visa application here.
So far, I have applied for friends from many countries and I have not received a single rejection.
Please refer to ICA's own documents for screenshots and more explanation for each step. These are all PDF files:
September 6, 2023
An updated, updated guide to the H1-B1 visa process for Singaporeans.
Singaporean citizens (and Chileans) are eligible for the H1-B1, a unique work visa of the US that was negotiated as part of a free trade agreement in 2004. There are 5400 visas set aside for Singaporeans, and 1400 for Chile. From what I know about the program, the 5400 number has never been fully utilized.
Singaporeans who are interested in coming to work in the US should consider a H1-B1. The other main work visa program, H-1B, requires a lottery program and it is getting harder to find sponsorship for companies that want to sponsor foreigners. Many companies simply don't want to spend the money on the H-1B program when they don't know if you'll get it, or when you can start
In this regard, Singaporeans have a bit of a leg up: only other countries like Canada and Australia have similar programs open to them, that are different / more straightforward from the standard H-1B.
The H1-B1 program is so simplified and it is much, much cheaper than the H-1B program. I've been able to get a job, set up an appointment (at the US embassy in Singapore), get my visa within a couple of days, and go back to the US to start or resume a job.
What are the positive aspects of the H1-B1 visa?
#
Not many employers know about this possibility, so very often when you hear about 'no visa sponsorship' they usually mean 'no H-1B sponsorship'. Very often, if you reach out to them (especially through a personal connection) to say that you have access to a different type of visa that is much cheaper, more straightforward, easier and faster to get, and that you know how to get it, that can open some doors. In my experience, companies are still willing to interview or hear you out if you mention that; versus automatic rejections at times if you state that you need a new H-1B visa sponsorship.
It's also very fast, cheap and easy to get. I have not heard of Singaporeans getting rejected for it (though I have heard of cases of some foreign-born Singaporeans getting additional scrutiny). It also appears to be easy to renew multiple times, as long as you have not filed for any green card or other paperwork that might make you ineligible for the H1-B1. For example, if you went to the US, found someone to marry, and then filed for a spousal visa, you probably don't qualify for the H1-B1 anymore.
The speed, cheapness and ease of getting this visa is why it is my recommendation for any Singaporean who is coming to the US to work. Especially if you don't know if you actually want to make the move, simplifying the visa situation will make it easier.
- Exceptions apply. If you work for a company that also has a US presence, consider getting the L-1 visa instead. This is especially true if you have a spouse. It is, at this point, not easy / possible for a spouse of a H1-B1 visa holder to work in the US (not without having filed for a green card and getting approval, which is a whole other thing). Whereas spouses of L-1 visa holders can apply for work authorization.
What are the downsides of the H1-B1?
#
For one, it is a non-immigrant visa, unlike a H-1B. If you have plans to apply for a green card, definitely try for a H-1B. However, many Singaporeans I know have also come first on the H1-B1, then tried for the H-1B lottery, then switched to it; if not, they can always get another H1-B1 visa.
Secondly, it is valid for a shorter period of time. It is for 18 months. On arriving in the US, you get stamped in for just 12 months; you have to leave and return to the US to get the remainder of the 18 months.
This was not a problem for me as I anticipated that I would want to go home to see my family, and country where I have deep and strong ties, every 12 months anyway.
The short visa validity can cause some logistical issues. For example, I still don't have my drivers' license, partly out of my Singaporean apathy to car driving, partly because every time I get around to the DMV my visa is about to expire. It made no sense to get a driver's license that would expire in a few months (or weeks, last time I tried to get a driver's license), so I've just sort of kicked that can down the road. It doesn't really matter to me whether I can drive or not. It may, if you live elsewhere in the US with less public transit.
Also, if you have a spouse who would like to work, it is not possible for them to work if you have a H1-B1. Consider a L-1 instead, or other visa type if this is important.
How do I get a H1-B1 visa and work in the US?
#
- Make sure you are a Singaporean (or Chilean) citizen
- Apply for a job, get the job
- Get your immigration attorneys to file for a LCA with the Department of Labor. You must have this document certified by the Department of Labor and sent back to you and you must have this in person with you at the US embassy when you go for your appointment. In my experience this has taken around 7 business days to be certified
- While waiting for the LCA to be certified, start your DS-160 application. Some advice: expect to take a few days to complete the application. Write down the application number, and your security question. Get your passport photo ready as a digital file in a square format and make sure it is resized to under 240kb, and in jpg format (photo requirements here).
- Give yourself plenty of time to fill in the DS-160 form, especially if you are a first-timer. Save it constantly. You have 30 days to complete it. If you think you'll take more than 30 days, return to the application with the application number and security question, and save it or fill in more questions.
- Once you have completed the DS-160 form and submitted it, and have your LCA in hand, go to this page and select non-immigrant visa. If you have an immigrant visa, you probably know what you're doing and you can make your own choices from here. Click login, then new user. Create your account. This UStraveldocs account is what will let you schedule embassy appointments and decide how you get your visa delivered or picked up in the country you're applying in. The DS-160 form was a state department thing. You need to do both, but the USTraveldocs part is almost always the last step. And the first time I did it, I didn't know what to do or where to go after I submitted my DS-160!
- There are some quirks with this USTravelDocs step, so listen closely (and also seek out updated information as this process is likely to change more to meet local conditions, than the DS-160 or LCA process).
- Once you have logged in to US Travel Docs, click New Application / Schedule Appointment. It will prompt you to fill out your passport information. If you have a spouse or children with a H4 visa, you also add them here.
- Go through all the screens and fill in the information that only you know (your passport number, expiry date, visa type).
- This part is the most important. At some point in the application it will ask you for: Petitioner's Name, Receipt Number, Start Date and End Date. This is confusing and your US immigration attorney is likely to also not know what to do with this. From other posts written by others, I learned: these fields are kind of silly and no one knows what the right answers are / it doesn't really matter, but you have to fill in something anyway. Here's what's always worked for me.
- Petitioner's name: I put my employer, which is the City and County of San Francisco
- Start Date: I use the start date on my certified LCA
- End Date: I use the end date on my certified LCA
- Receipt Number: (This is different from receipt number elsewhere in this process. It is a dummy number. The only answer that works is this: ABC1234567890 (thanks to Ashley Lim for figuring this out)
- Finally, it will ask you how you want to collect / pick up / have your visa delivered. I always pick Chinatown, but I've been told by people at the US embassy that the fastest way to get your visa back is to select the Aramex at Changi South location, which is available as a 'paid dropoff/pickup'. This location is very far for me, so I almost never do this unless I have a very tight turnaround on my travel plans. I think it's something like a whole day faster than the Chinatown location. Otherwise, I prefer to do Chinatown as it's easier for me to go there, and also easier for me to get food afterwards. I am Singaporean, after all.
- On the last screen, you will be prompted to make payment. At the time of writing (September 2023) the options are: VFS Cash / Debit, or Electronic Funds Transfer (EFT). VFS is a global company that many embassies outsource their visa work to around the world. EFT means 'bank transfer', as many Singaporeans will be aware of. VFS Cash/ Debit means 'go to the VFS office in Anson Road and pay it at the counter', which is far less convenient than 'log in to DBS banking and make payment'. When you click on either option, you will get the amount to pay in SGD, and a receipt number.
- If you select EFT, save the page PDF and copy down the SGD amount AND the receipt number.
- Log in to your Singapore internet banking and set up a new payee. The payee name is VFS Singapore, the beneficiary bank is DBS, and the payee's account number is (and this is very important) YOUR RECEIPT NUMBER. Your receipt number functions as a virtual account number so they can match your payment to your application. If you don't have a Singapore bank account but are applying out of Singapore, you will probably have to go to VFS on Anson Road, or get a Singapore friend to do it for you.
- Once you have completed your payment, wait until 12pm the next business day in Singapore to return to the USTravelDocs page and add in the receipt number from the payment slip you got, to complete the process. If you try to do it any earlier, you won't be able to proceed. It will just say 'transaction not found'.
Special note about H1-B1 visa for Singaporeans and their non-Singaporean or same-sex spouses
#
While the H1-B1 visa is only for Singaporeans, your spouse and children don't have to be. This means that if you, like me, are queer and married, your marriage is recognized as long as you have a marriage certificate from a country that performs it.
If you are a same-sex couple that is interested in moving to the US, feel free to email me at adrianna [at] jefritan.com and I can help answer any queer-specific questions you might have.
Should I move to the US? There are guns and stuff!
#
That's entirely a question for you to answer. As a queer Singaporean, I needed to go somewhere that would give me and my non-Singaporean wife a place to live. We looked everywhere, and the US (California in particular) was still the place that gave us the things that we needed. It also welcomed us with very open arms. We are thankful. But it's not for everyone, certainly.
Anyway, the advice I always tell young Singaporeans is that you don't have to think about this move as a permanent one. You can always go home. Which is a luxury, I've learned, especially in speaking with immigrants from other countries here. The idea that I can return to a country that's my own, without much change to my physical standard of living, is a luxury. Whether or not I can be fully queer and married in Singapore is a whole other thing. For now, I am living the life, and enjoying every moment of it (even if I cry once a week about how much I miss Singapore).
August 4, 2023
I am trying to read more Chinese books. My Mandarin school teachers are probably having the last laugh, but I am genuinely interested in some of the fiction in the Sinosphere these days. Unfortunately my school-time Mandarin class experience was so poor (old school, traditional, not fun or engaging) that I feel like I am starting from scratch.
Thankfully, technology helps. I no longer have to peruse a large Chinese dictionary by looking up total number of key strokes (even though I'm glad I learned that skill). With a few things in place, I can quickly level up.
I use Calibre for ebooks. It's pretty customizable.
- Get your Chinese ebooks wherever you get them, and add them to Calibre
- Click to open and read the Chinese ebook inside Calibre's ebook viewer
- Highlight some text and mouse over the symbol that looks like a little library
- A library / lookup window should show up on the right
- Click Add Source
- Add the following source: name, MDBG
- Add the following permalink:
https://www.mdbg.net/chinese/dictionary?page=worddict&wdrst=0&wdqb={word}
Now, whenever you highlight a word or phrase, it should popup the Chinese dictionary result.
Some example photos:
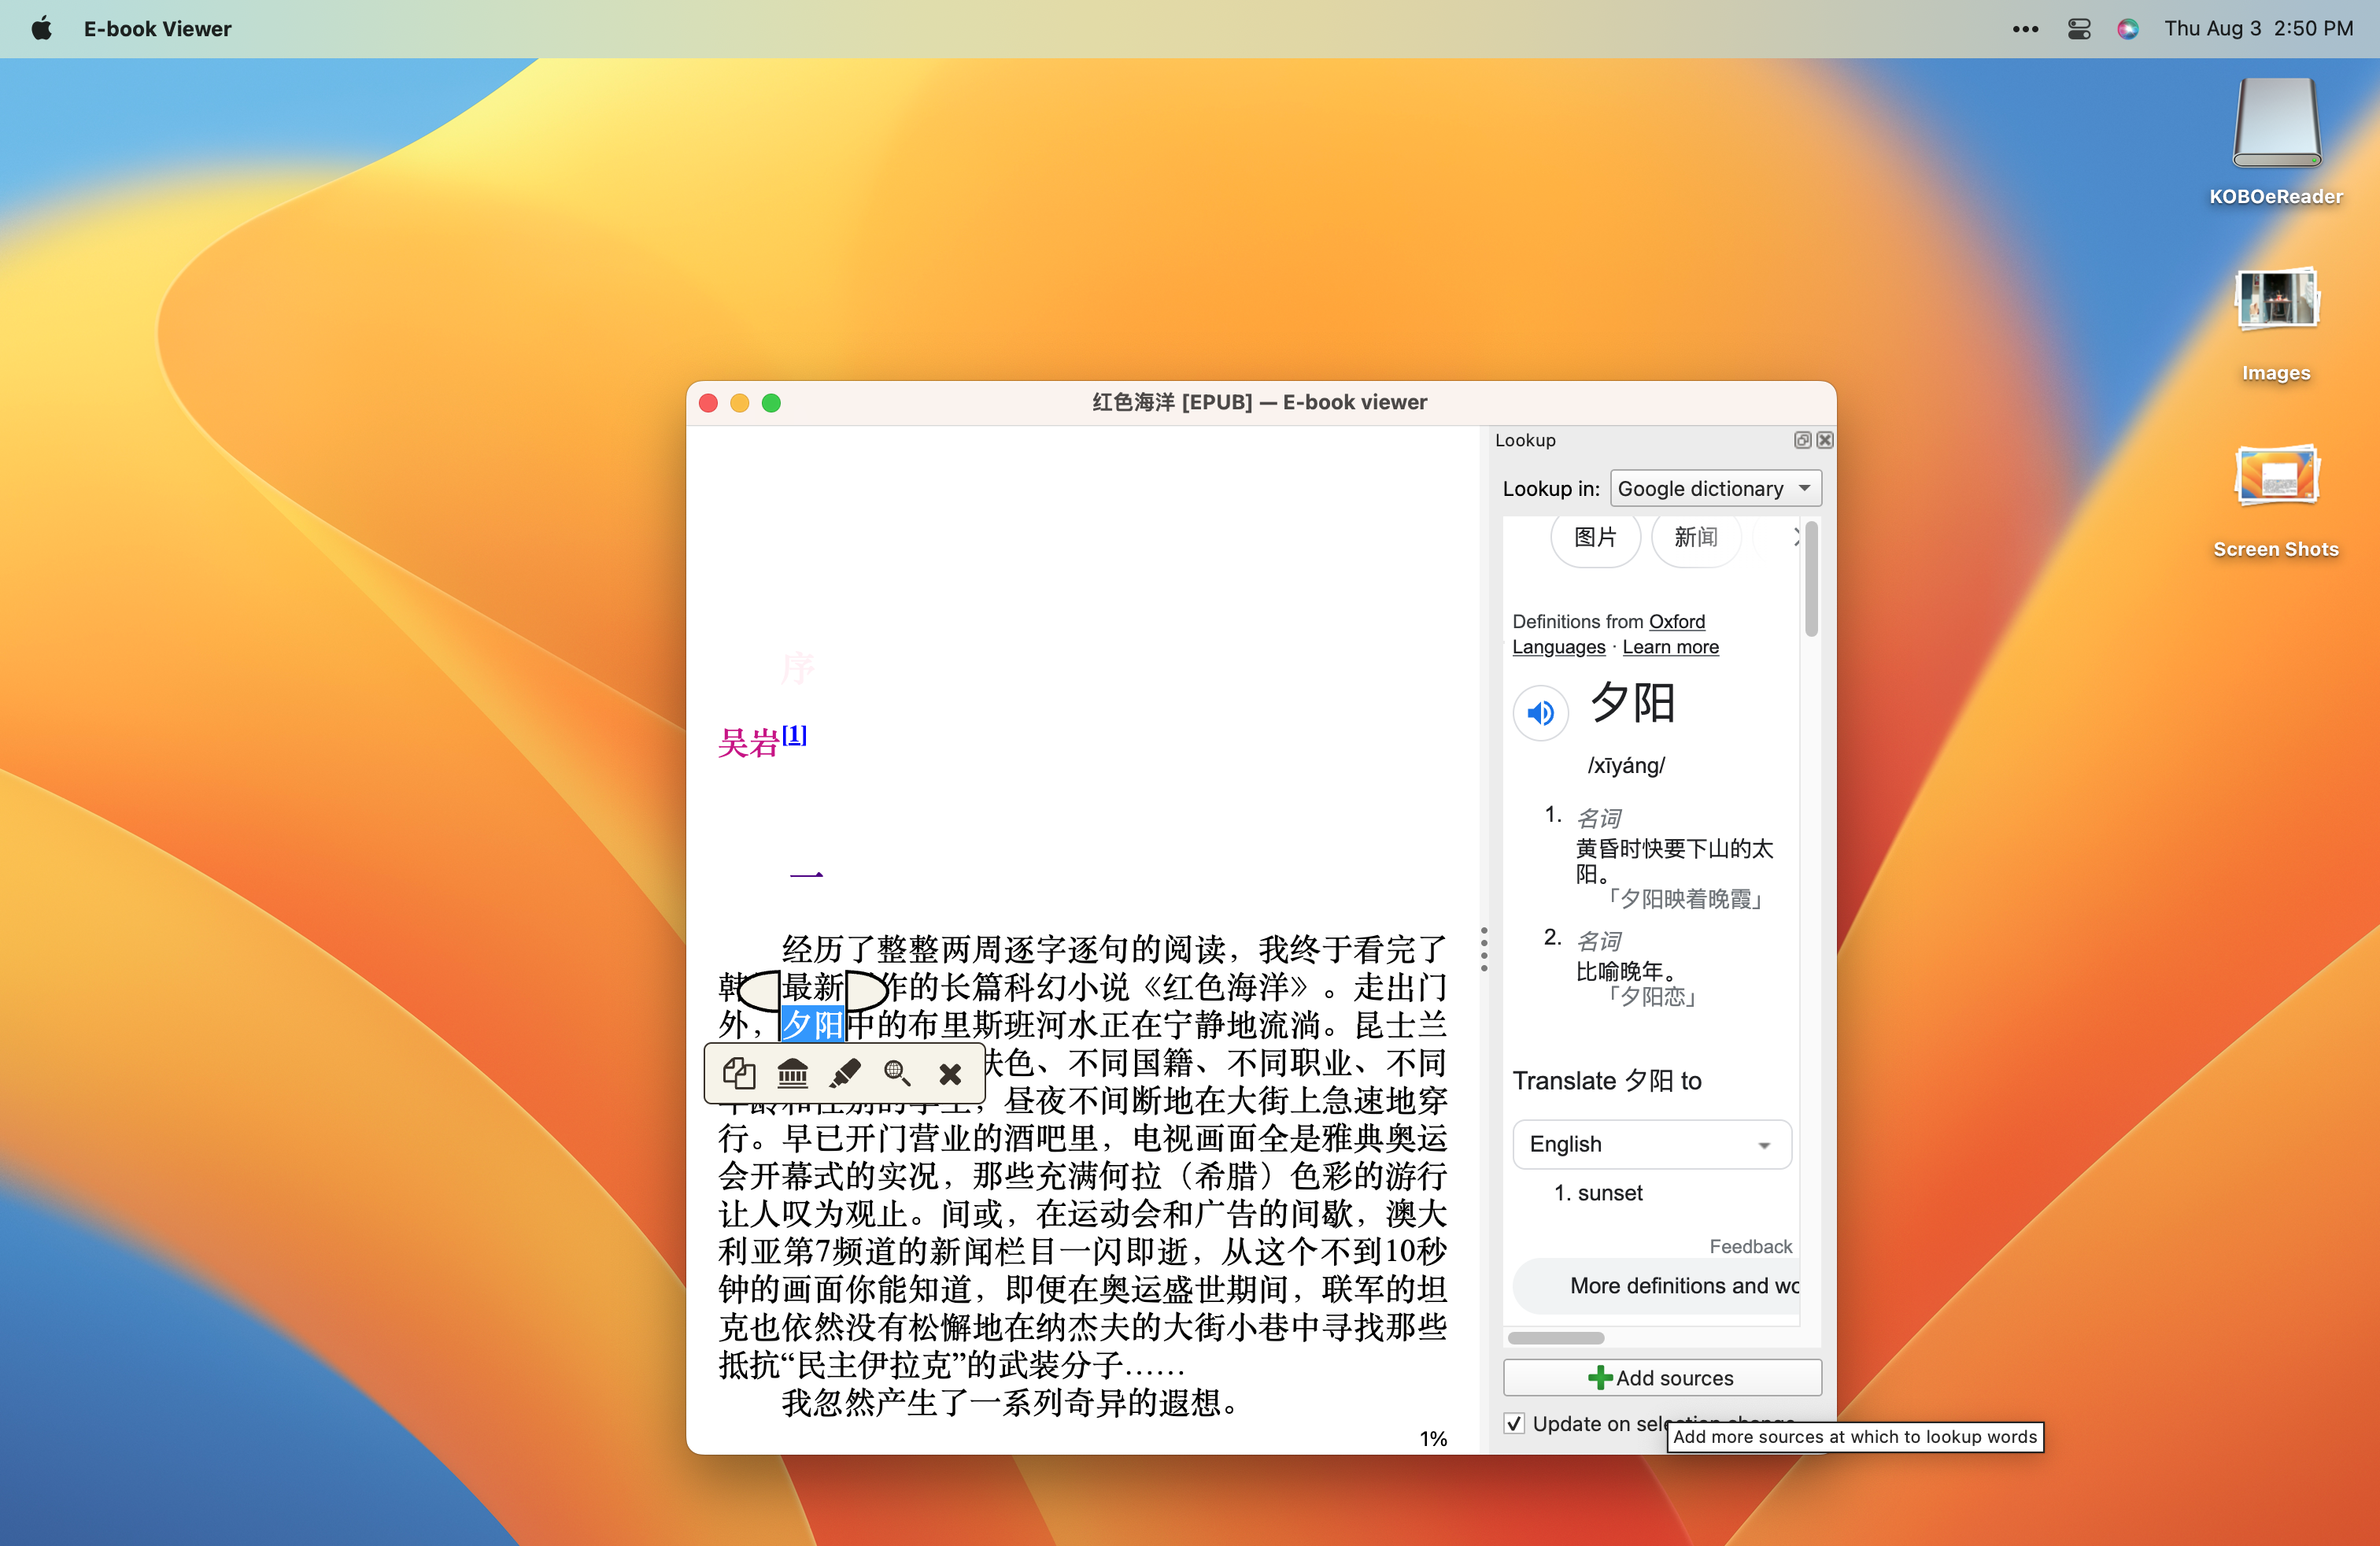
Highlight text in the ebook to pop out the lookup / dictionary view on the right.
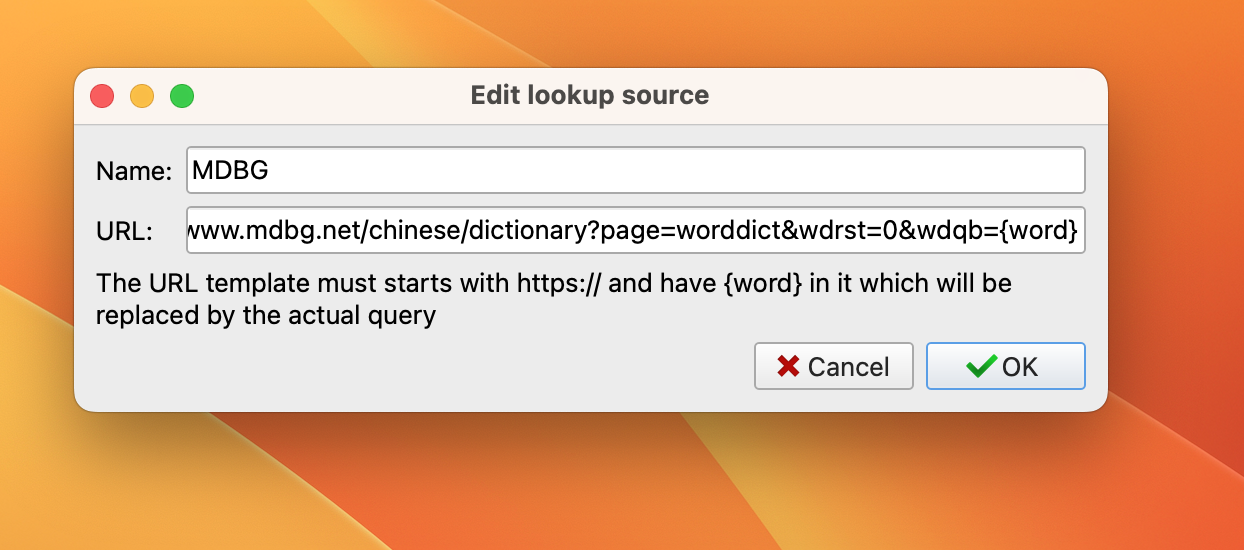
Click add source, then paste the url https://www.mdbg.net/chinese/dictionary?page=worddict&wdrst=0&wdqb={word} into the box.
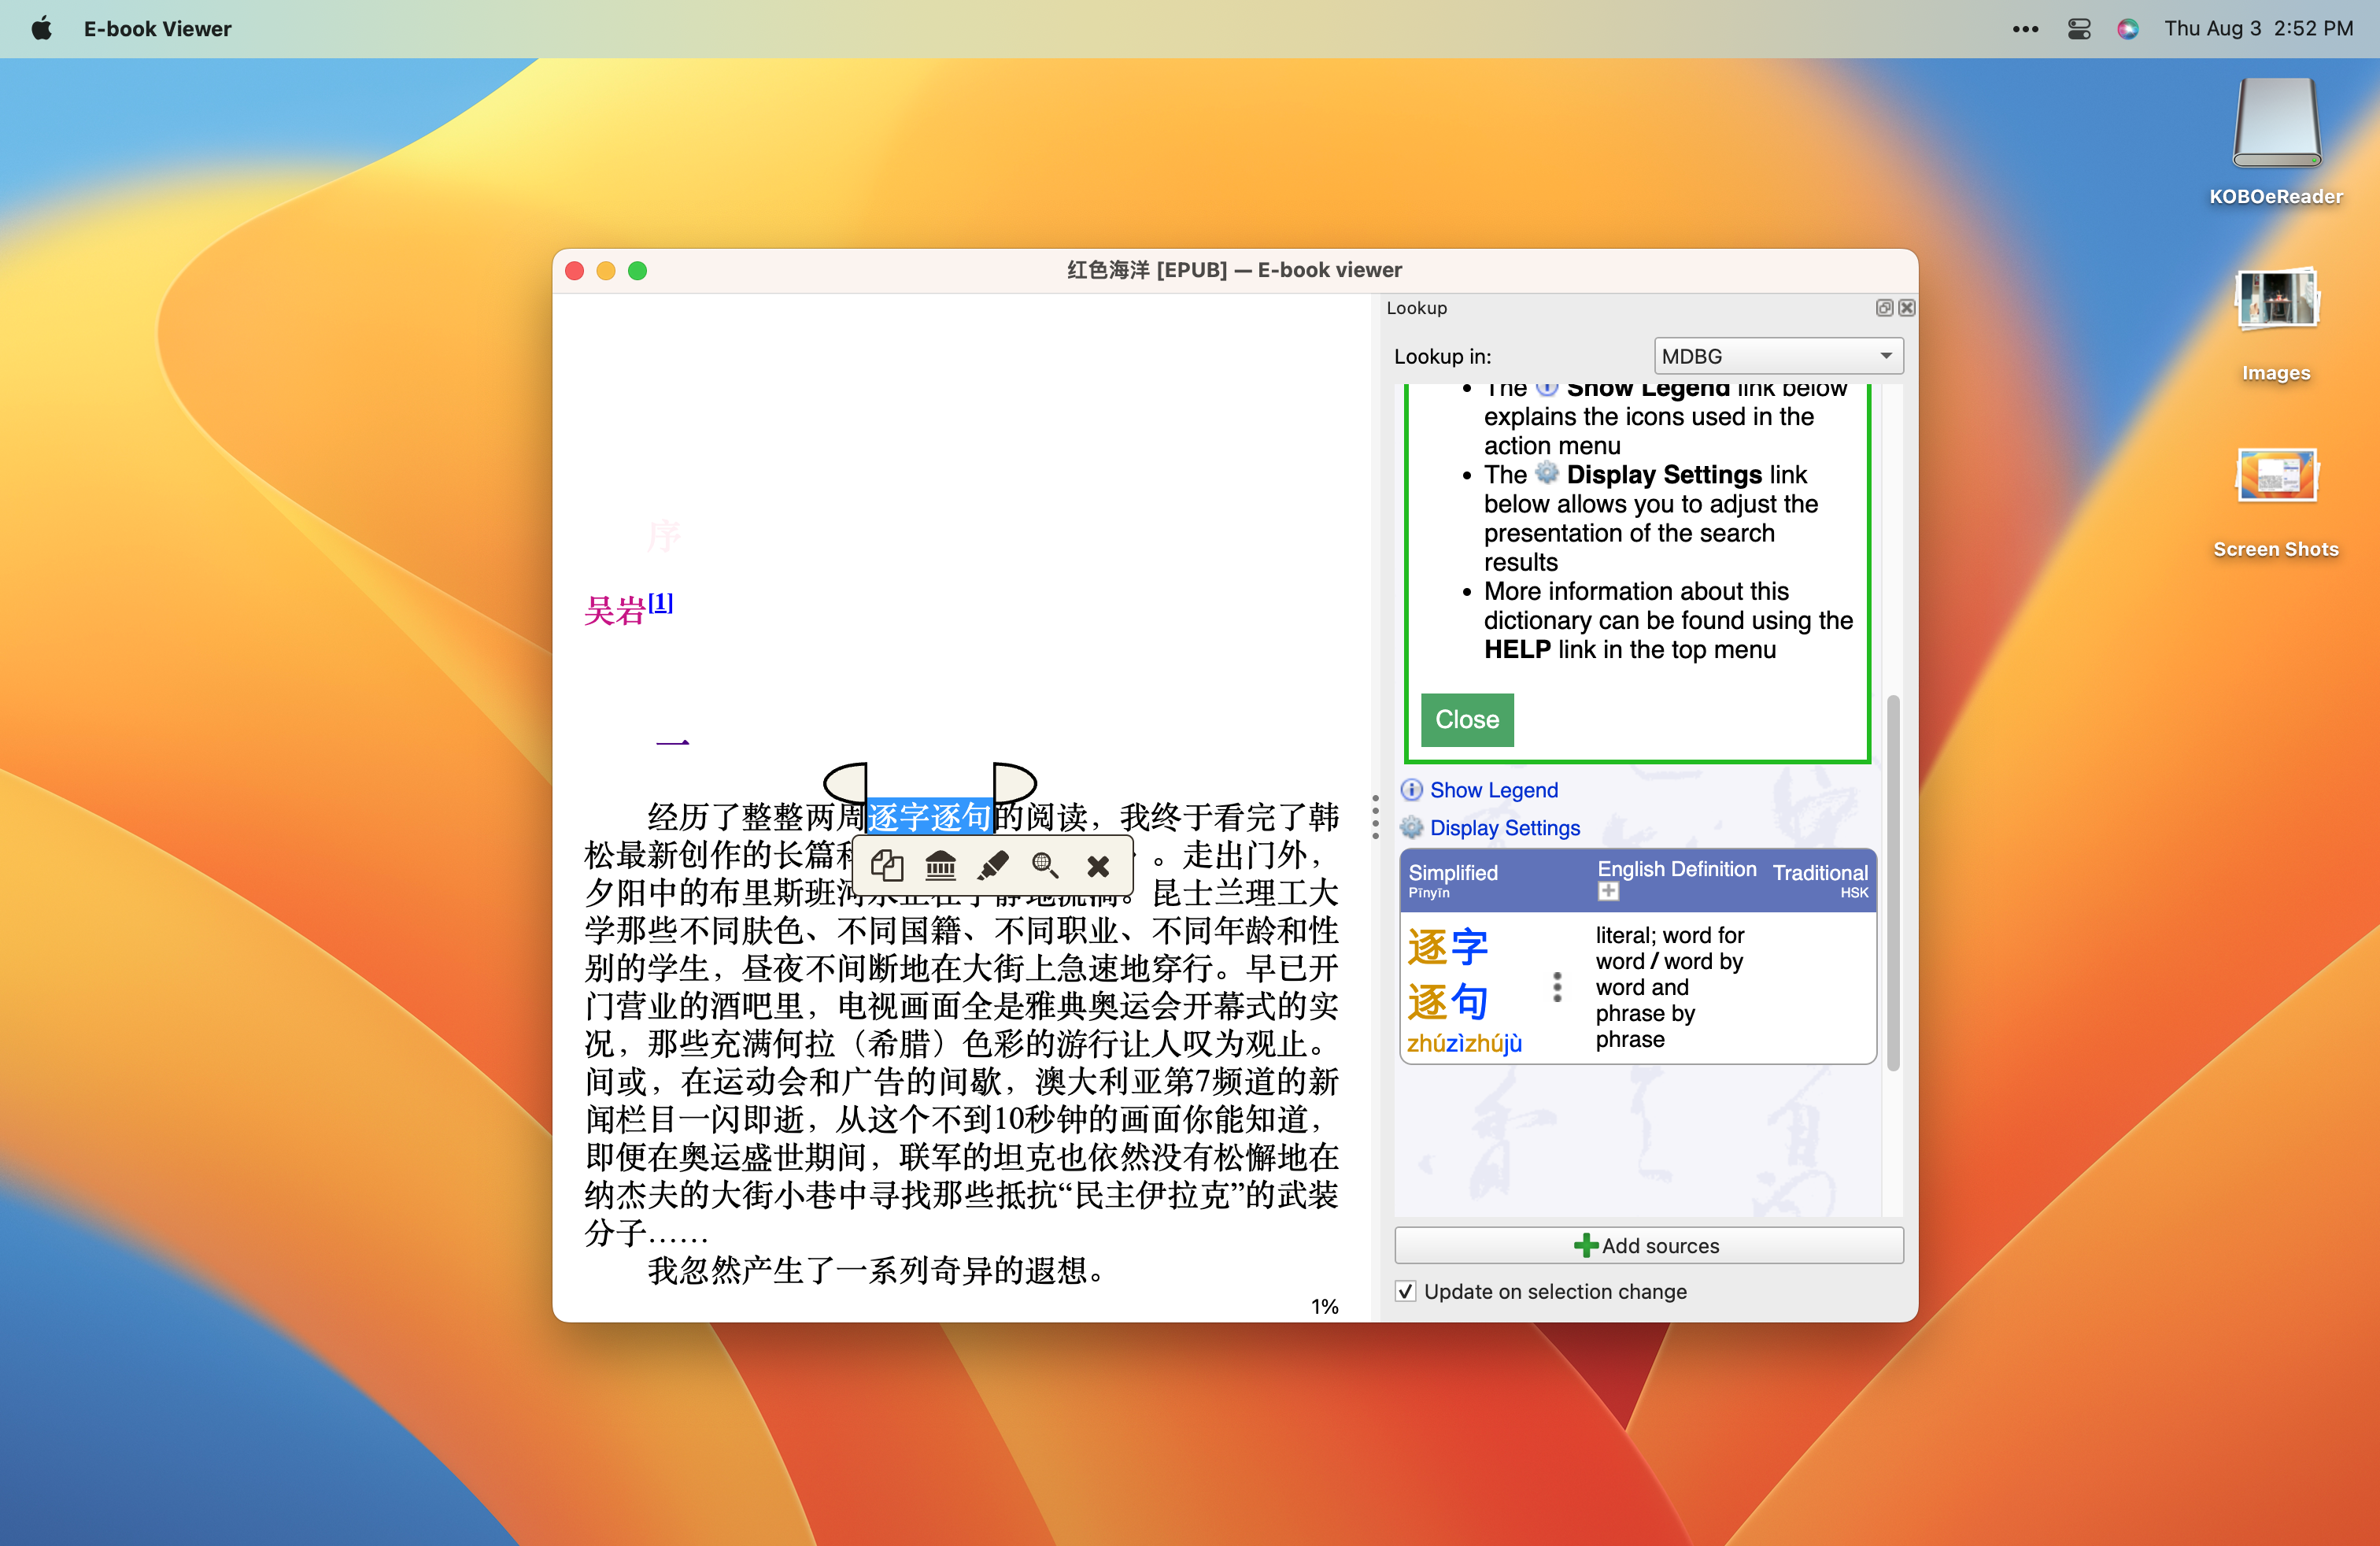
If all goes well, you should now see the definitions from the Chinese dictionary.
Happy reading!
June 27, 2023
Like so many people who still shoot film, I am now mostly rolling my own. Bulk loading, once you have the equipment, is really easy. I mostly buy bulk rolls of film stock that I can't get off the shelf, so that's a lot of Kodak 5222, Ektachrome, and also motion picture film.
You can get bulk rolls of many black and white film stocks easily; none for color, except for motion picture color film (I will write another post about how I learned to shoot and process this later on).
All of this has to be done in the dark.
At home, I use a dark changing bag. You really don't need a darkroom for most things unless you want to do prints.
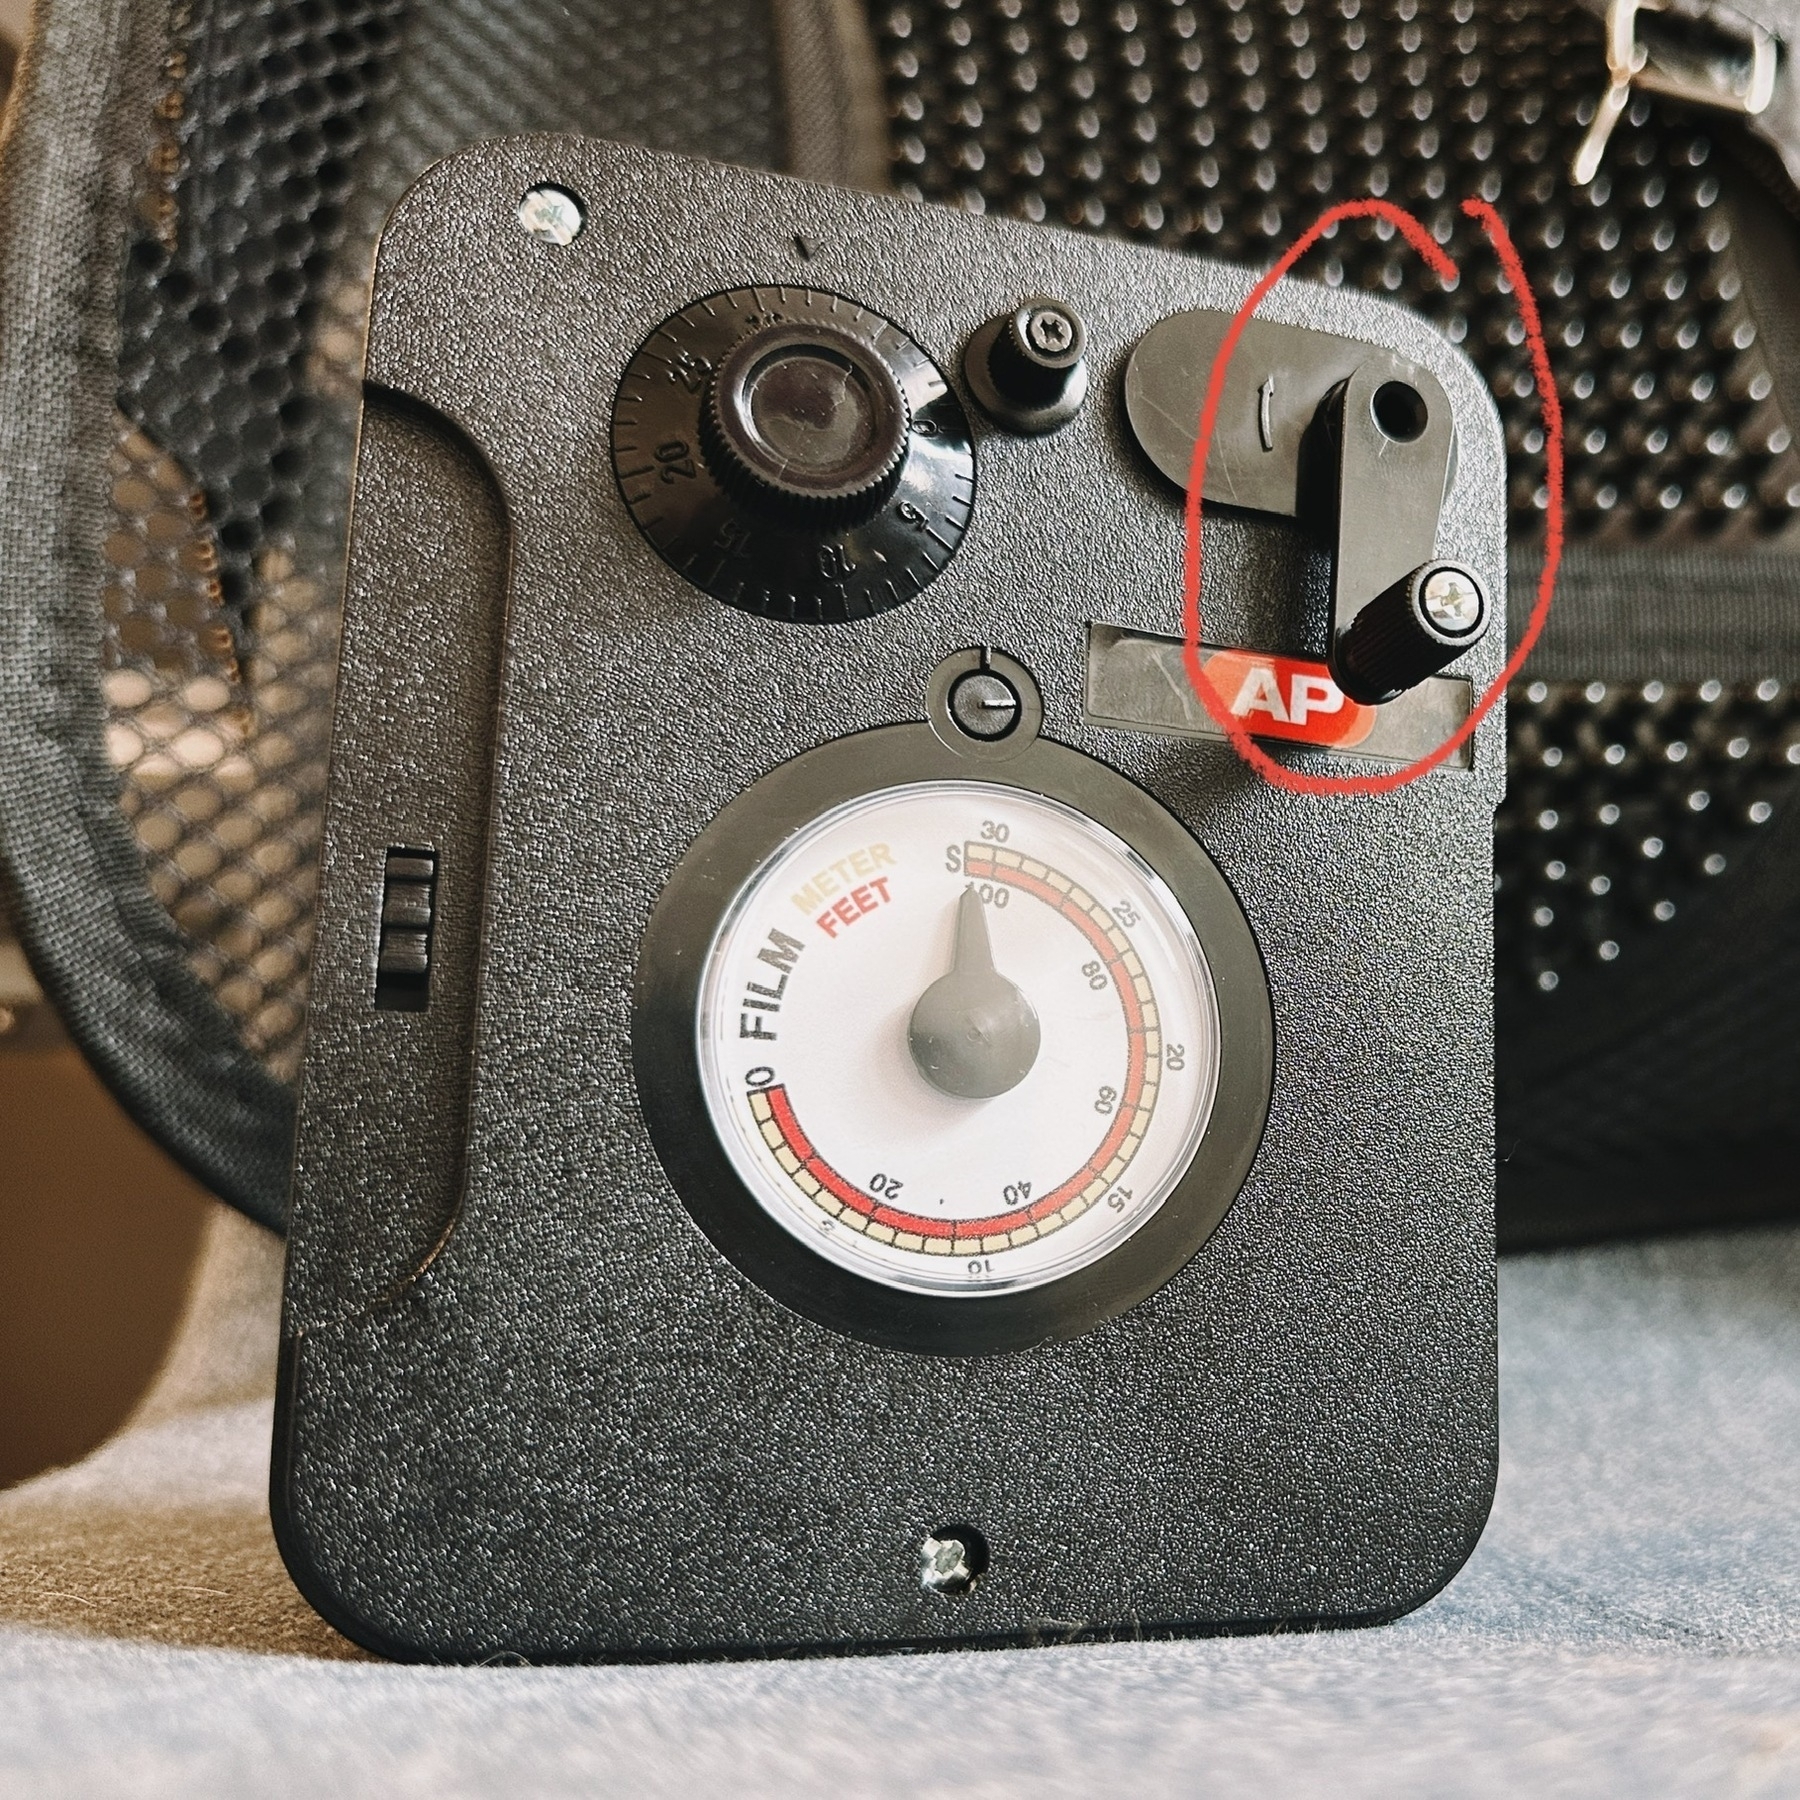
I pop the back of the quick loader open, leaving the crank in. You won't be able to load the film unless you have this crank in. I learned the hard way.
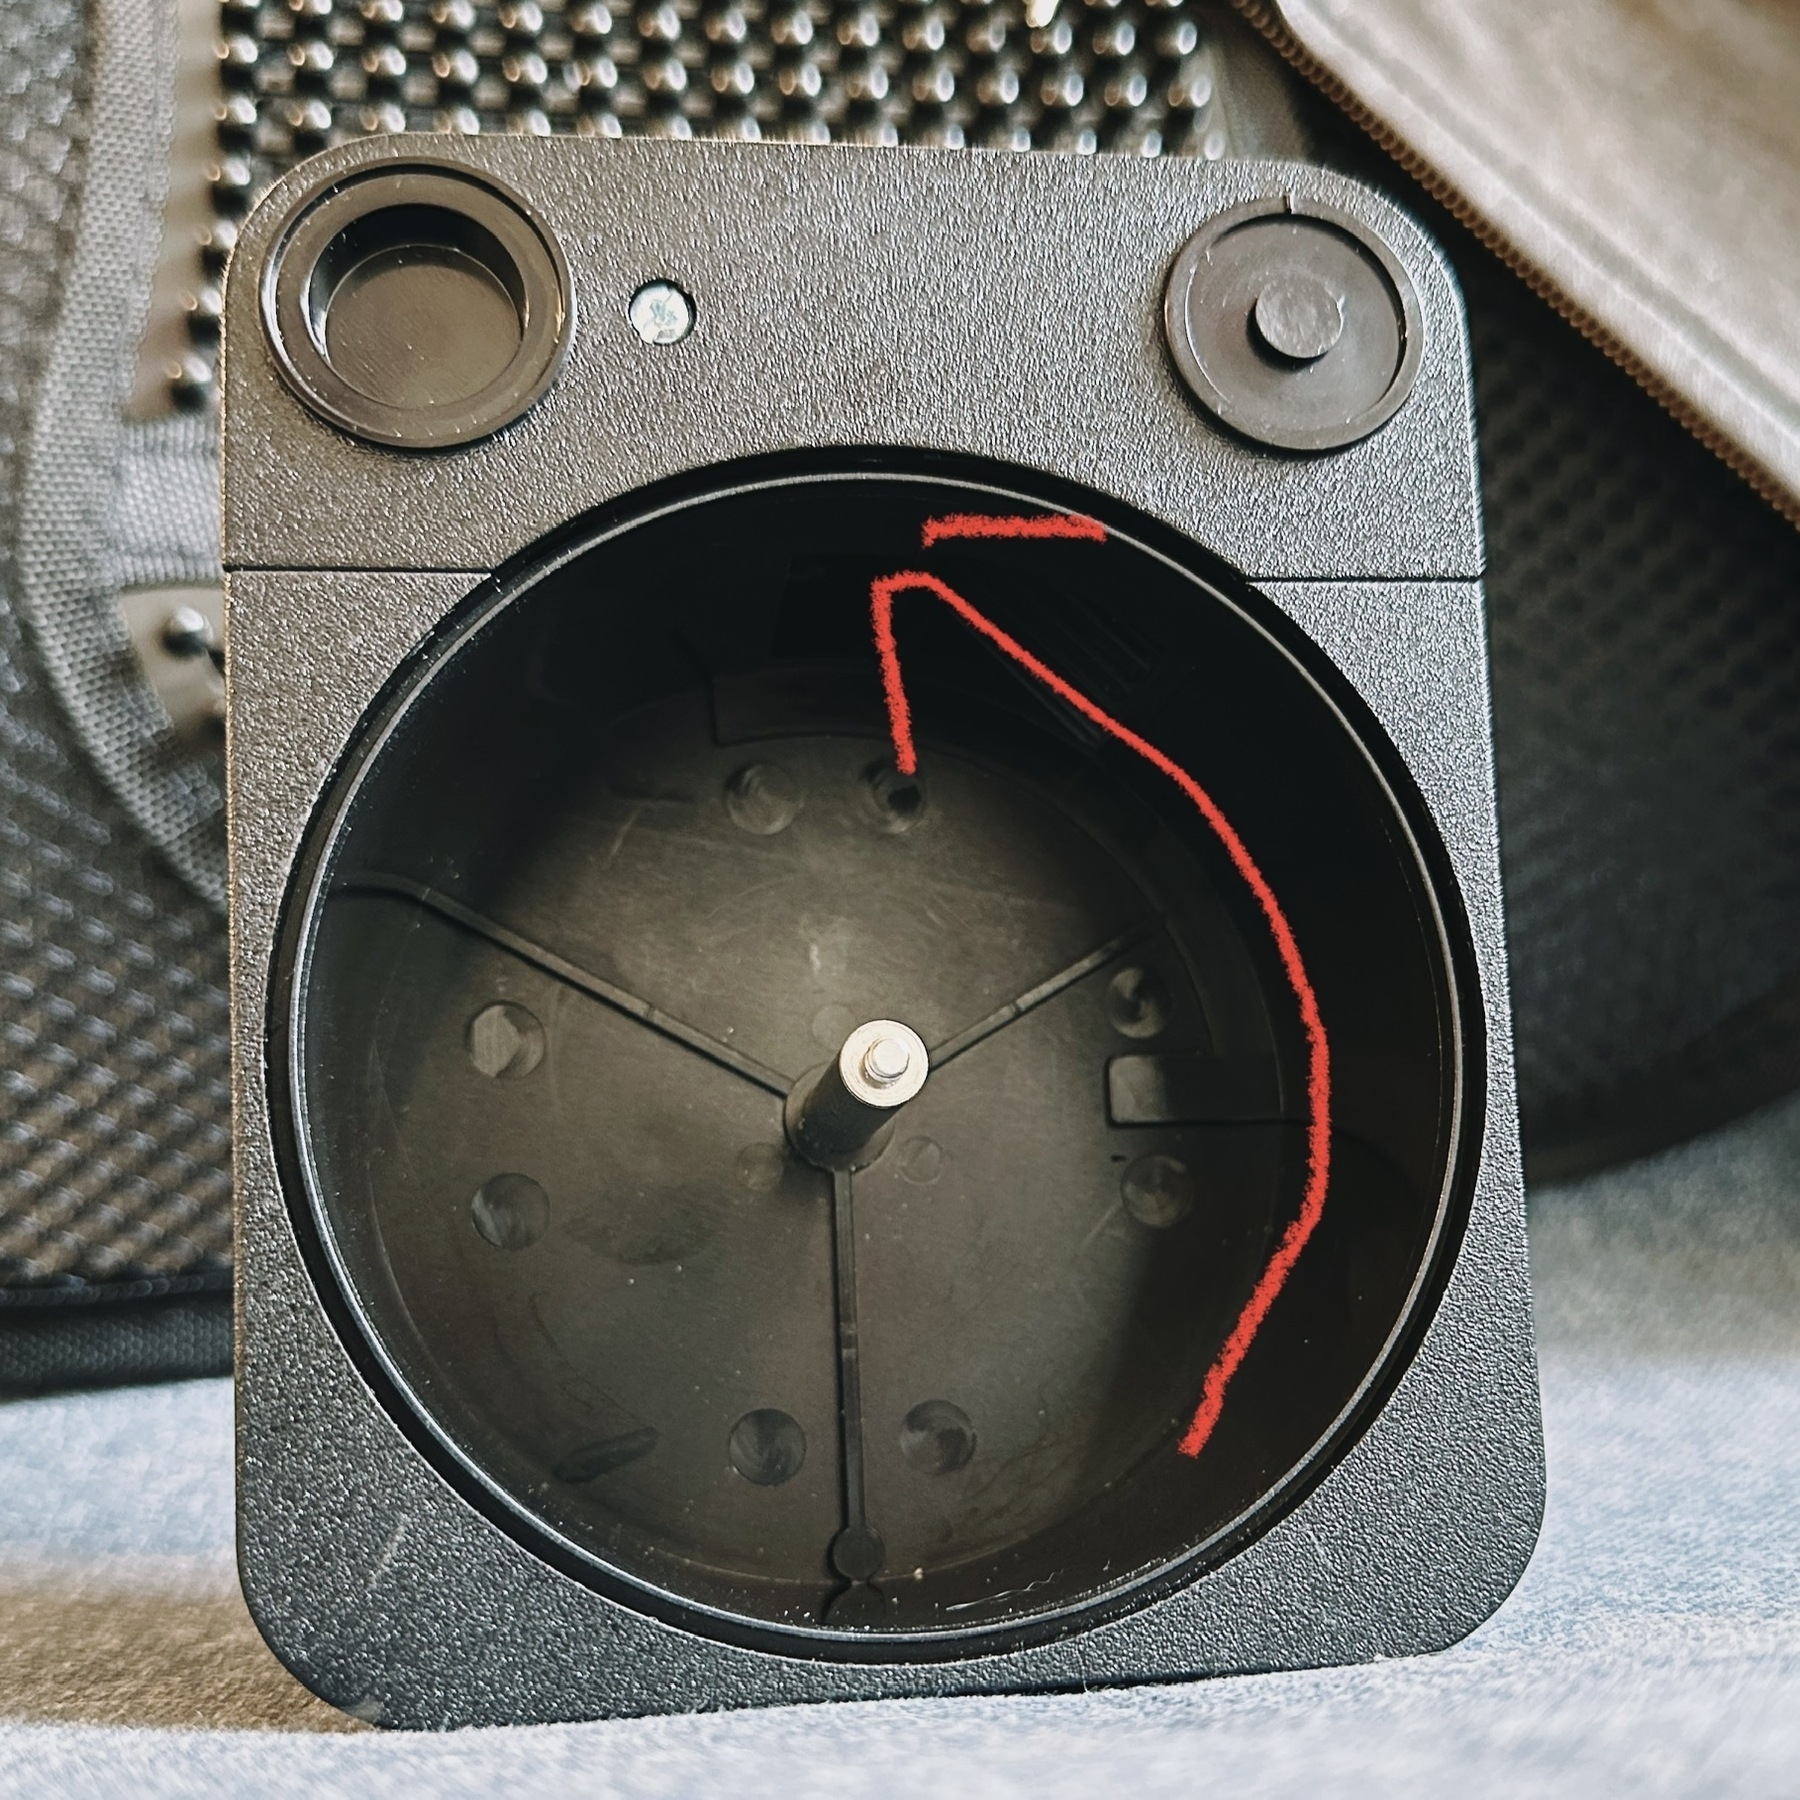
Then, I remove the film from the packaging. If you buy bulk film, only do this in the dark. Shiny side up, I move the film into the recess very slightly, then use my left hand to tighten up the rest of the roll and make it fit in the back. The center of the bulk film roll sits on the spindle, like a roll of tape. Note that film will not advance past the recess unless you have the crank installed in the front.
Shut the back of the loader, screw it tight.
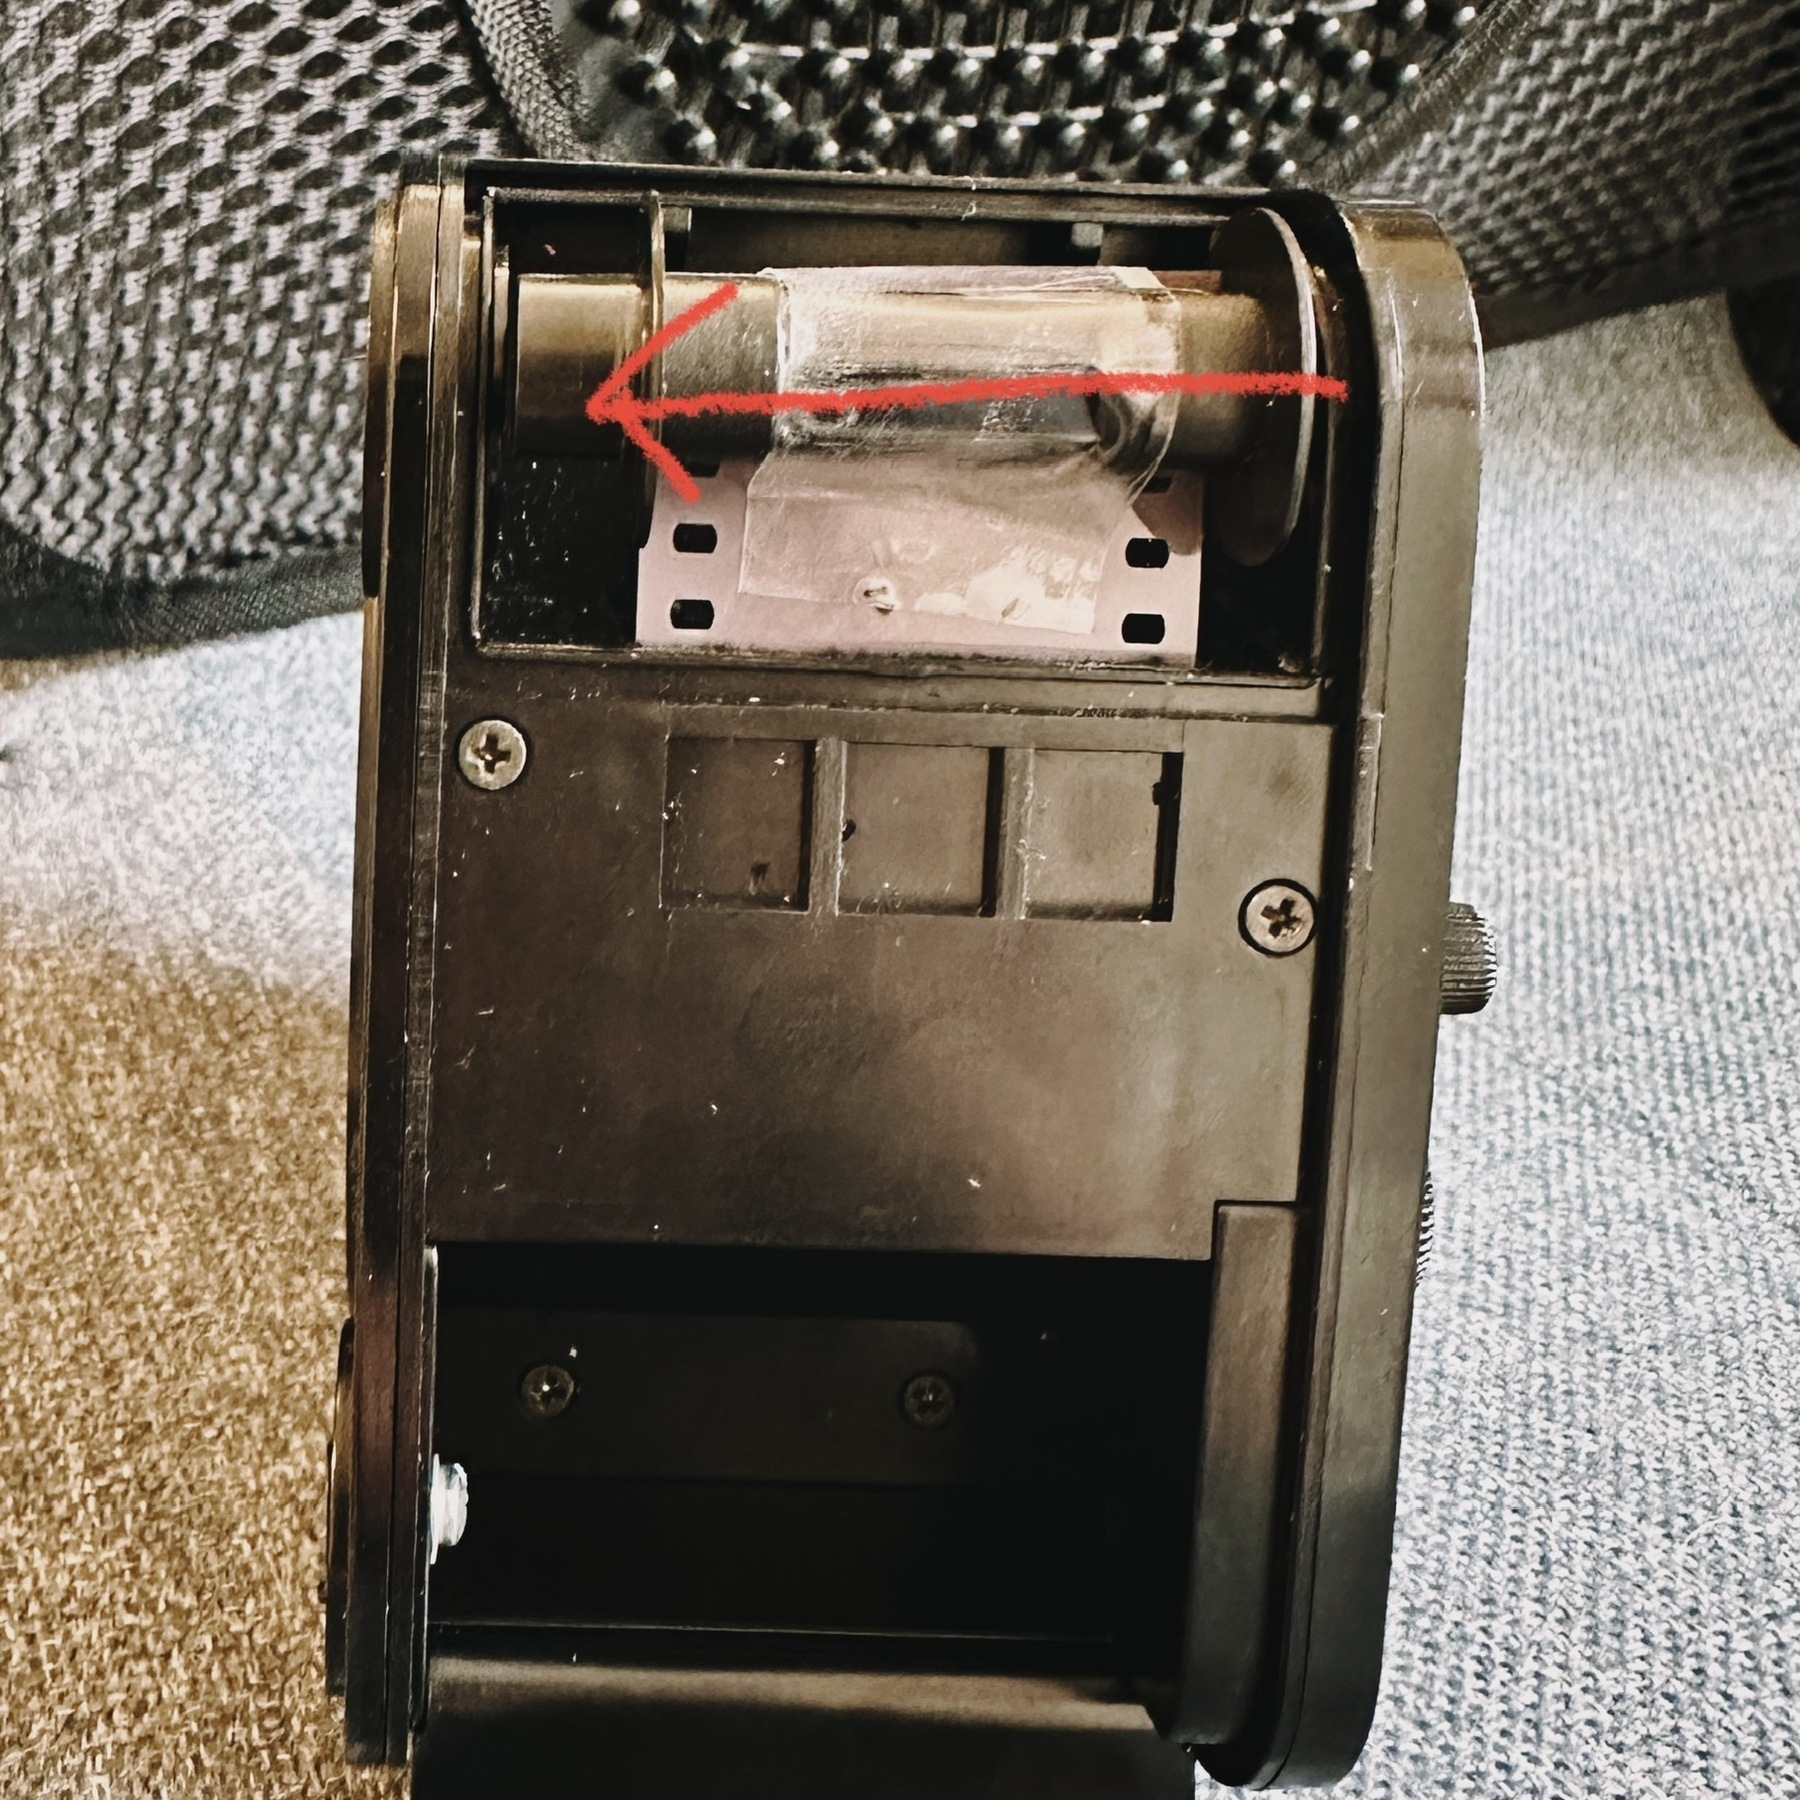
Take the loader out of the dark bag. You can use the bulk loader in daylight now. (It only needs to be in the dark when you are loading the bulk roll)
Remove the film advancer crank. Remove the spool part of a reusable film cassette (I use Kalt, but you can also use these). Cut some adhesive tape, and wrap around the spool. The pointy end of the spool should point towards the back of the film loader.
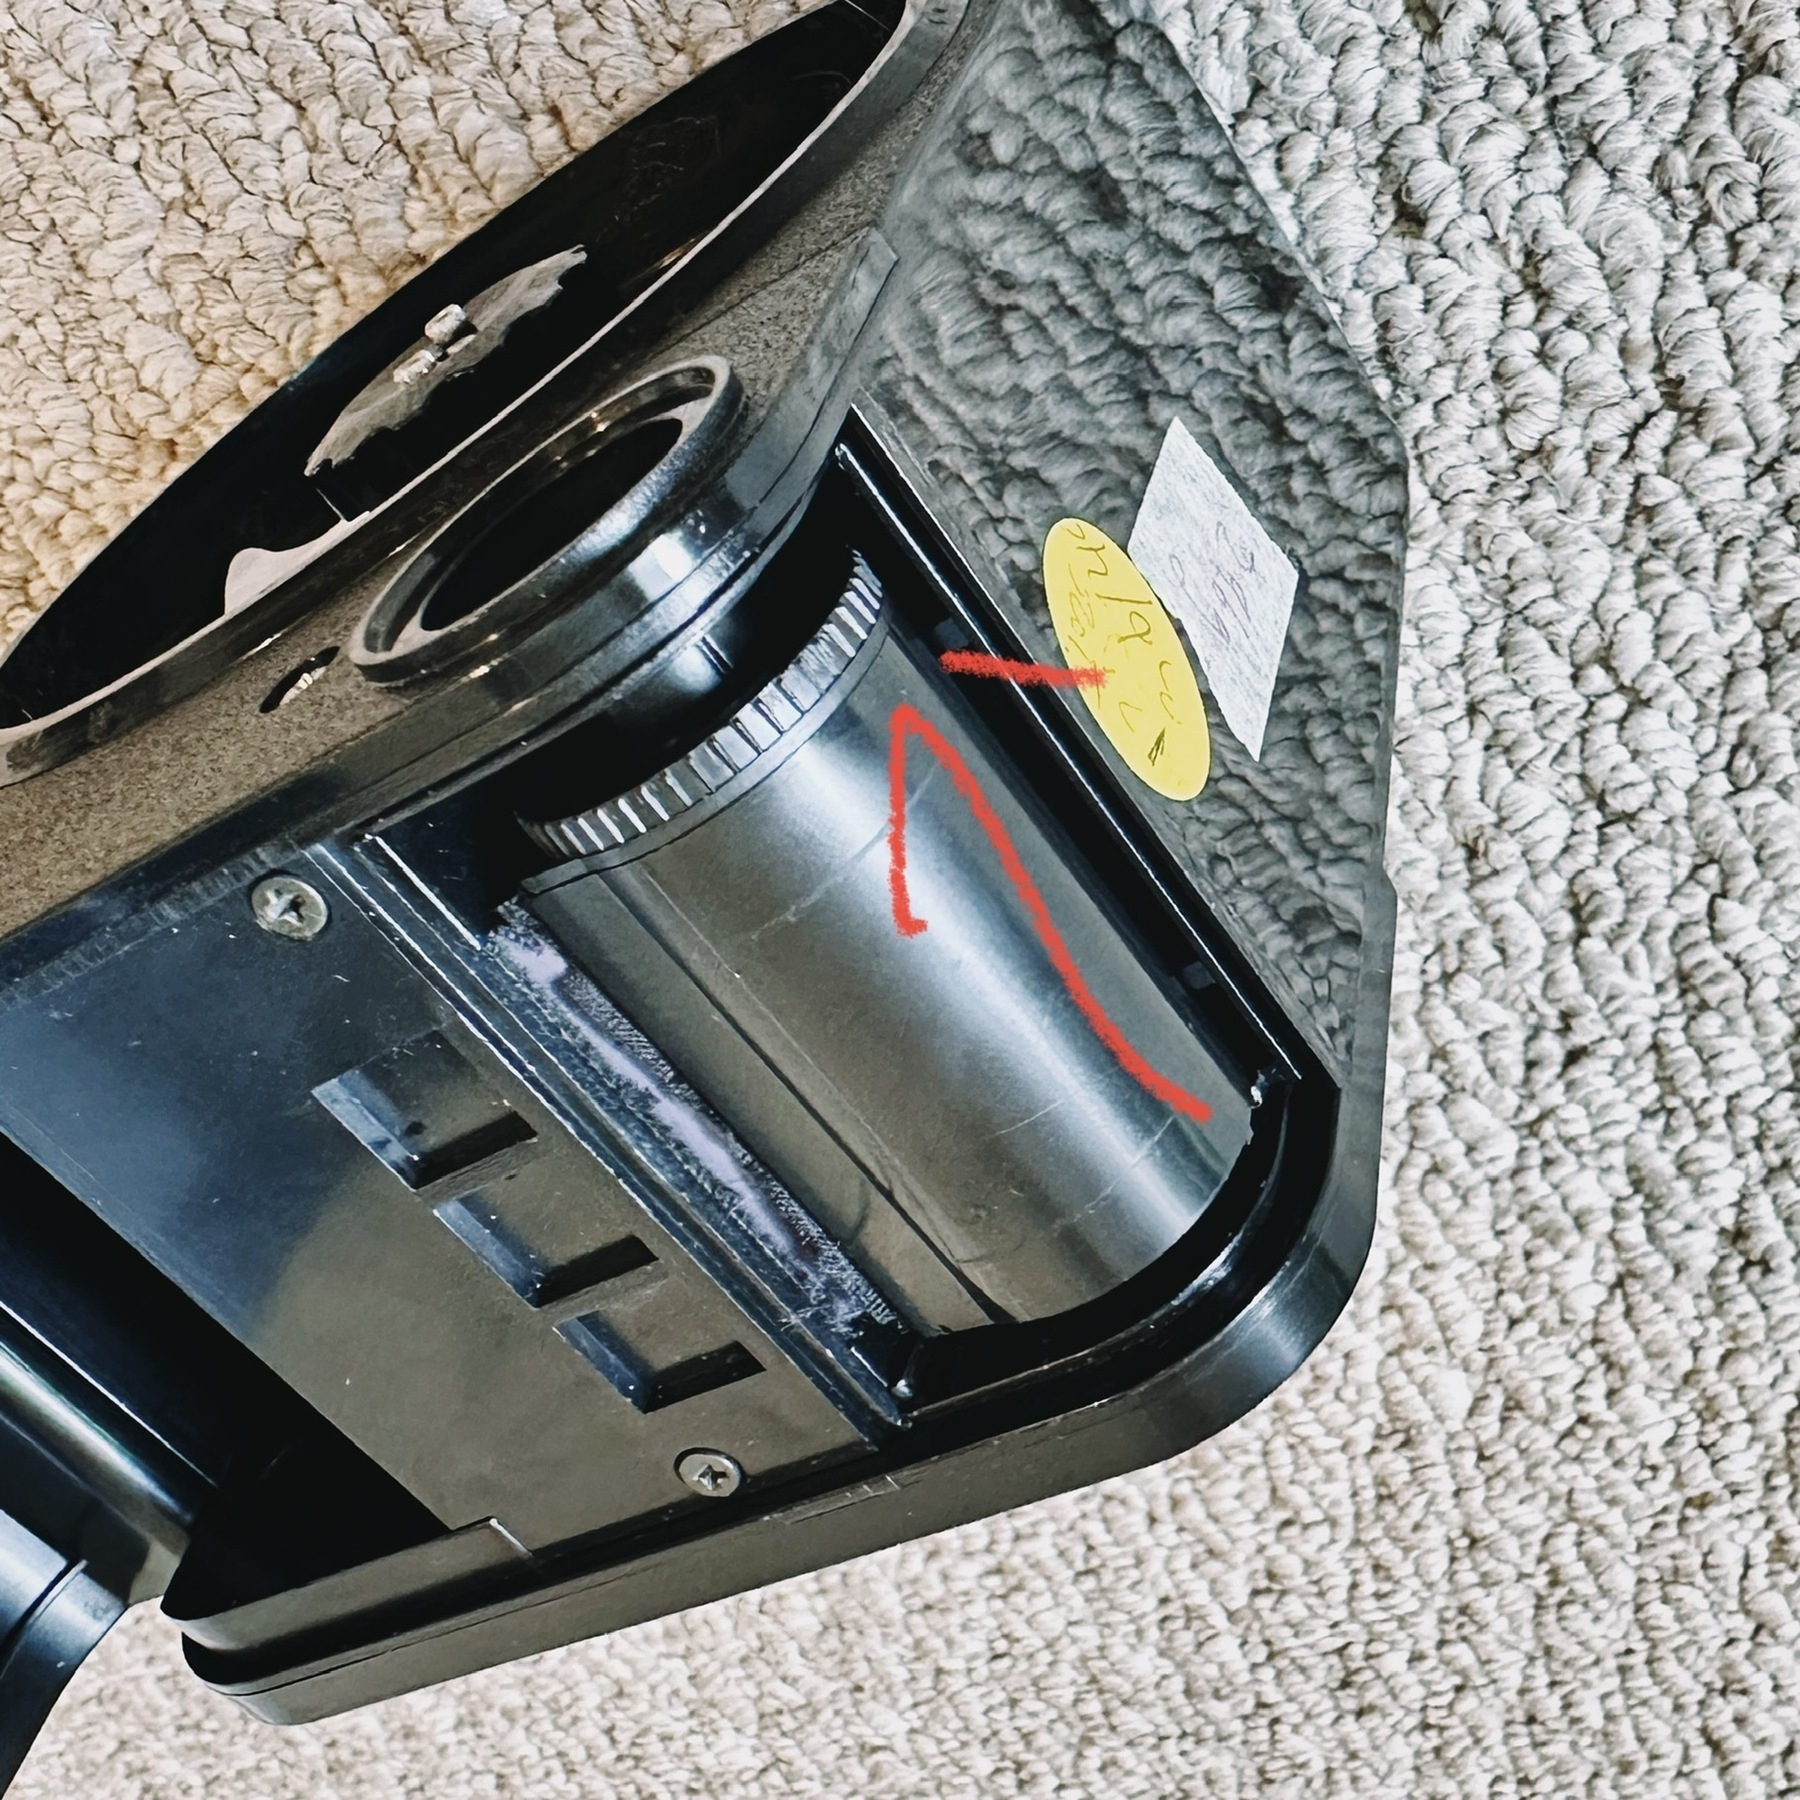
Pull out some film and stick the tape on the film to secure it. Grab the film cassette casing and gently slide it so that it encases the film and the spool. Note that this takes some practice: you essentially want to gently twist the film and spool to fit the slit of the casing. Sometimes this can be tough, but keep trying (gently). Screw in the cap to close the cassette.
Use the small film winder knob (next to crank) to move the spool into the bulk loader so it sits securely. Close the cover.
Set the counter to 0. Insert the crank. Holding the loader in one hand (I like to tilt it backwards with my left hand), turn the crank until it reaches the arrow. You want to add 4 or 5 extra frames from 36 (or however many frames of film you want per roll). Remove the crank. Open the cover. Use a pair of scissors to cut the film, pulling out enough to make a film leader.
Repeat.
You can get around 18 rolls per 100 ft roll, which brings the cost of Ilford HP5 down to $6.67. Retail price for that film is $9.49, so you can save almost $3 per roll of film. If you're shooting 20 rolls of film in a month like I sometimes do, you save $60.
I have one Bobinquick loader that always has black and white film, and I've got another Watson type loader that has some other film, usually color motion picture film or bulk slide film. I get these from a friend who orders in bulk from Kodak in 400ft, then respools into 100 ft and sends me a few; so that can be even cheaper than buying 100ft rolls directly from a photography retailer.
Hope this helps! In case you prefer manuals, I've also got scans:
April 13, 2022
In a previous life, I had to use VPNs extensively. I was traveling all the time and often found myself needing to do online banking tasks in one country while I was in another. I also frequently visited some countries that blocked most commercial VPNs.
For that reason, I have been figuring out how to use different VPN and VPN-like services for a long time.
The latest and greatest stuff in this space, what I default to using more frequently now, is Tailscale.
Tailscale can do a great many things. Some people have called it the holy grail of networking. I am certainly a fan.
Today, I will focus on how I use Tailscale to replace VPN-services for me, and ignore the other cool things that Tailscale can do.
This assumes that you have existing hardware and a connection in the country you want to connect to.
The use case for this sort of thing is an endless list:
- I have a high speed connection at my home in San Francisco. I want to use my home network from abroad in order to access some banking or enterprise applications
- Commercial VPNs can be unreliable or slow
If you have a device you can always keep 'on', such as an old laptop or desktop, or Raspberry Pi, you can ignore commercial VPN services and just use what you have. Just remember to keep your device 'on' and don't let it go to sleep.
-
On an old desktop or other device that is always plugged in, and always connected to the internet, I install Tailscale.
-
I log in using my GitHub account (though you can also use your Google account). Tailscale will authenticate you and you should see the name of that device
-
Make the device you just set up route traffic through an exit node
-
Go to Tailscale admin console, pick the machine that says Exit Node, click the three dots and make sure 'Use as exit node' is enabled
-
Install Tailscale on another device. Select the exit node you just setup
-
Check your external IP address to see that you are routing traffic through your exit node at home
In my case, I went to a cafe near my house, used their wifi, and then connected to my exit node in Tailscale. I was able to verify there that my external IP was the same as the static IP address from my home network
Now, when I travel abroad, it will be much easier for me to access the files and services that I need, as though I never left.
5 posts tagged "tutorial"


